link to the site http://vpnuk.net/index.html
Setting up a VPNUK SMART DNS connection on PS3.
Smart DNS connection on PS3 are often problematic, we therefore recommend SmartDNS connections on PS3 are carried out on a router. Click here for information: Smart DNS Router Setup
1. Registering your IP on the SmartDNS service
Login to the Client CP using your VPNUK login username and password.
2. Go to SmartDNS Menu
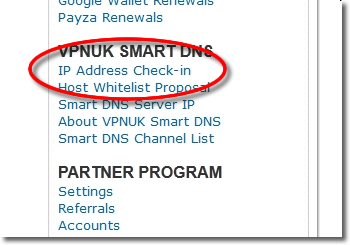
Go to the 'VPNUK Smart DNS' sub menu and select 'IP Address Check-in'.
3. Register IP
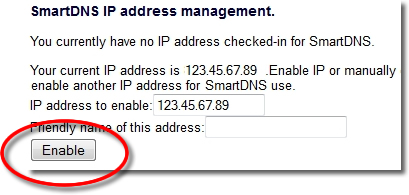
The Smart DNS system will reveal your current IP address, click onto the 'Enable' button, that will register that IP address on the Smart DNS service.
4. Confirmation
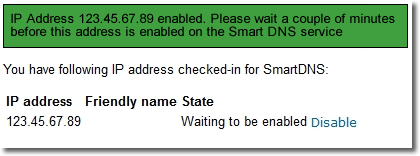
The Smart DNS system will confirm your IP address has been registered, it takes just a couple of minutes become enabled on the service.
5. Registered
The Smart DNS system will confirm your IP address has been registered, it takes just a couple of minutes become enabled on the service.
6. Get SmartDNS IP
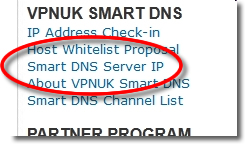
Click onto the 'Smart DNS Server IP' link in the menu.
7. Copy IP
Copy or make a note of the 'Smart DNS Server IP' that you are to use, you will need this later in the setup.

8. Settings
Go to Settings -> Network Settings
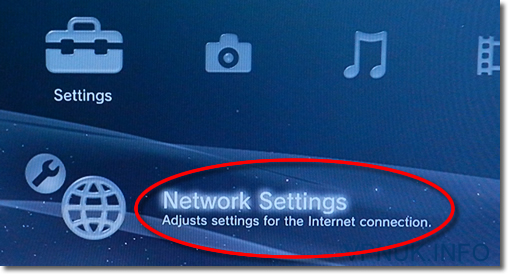
9. Connection Settings
Go to 'Internet Connection Settings'.

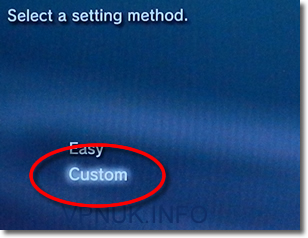
10. Custom
Select the 'Custom' Setting method.
11. Connection Method
Select your connection method, in this tutorial we use the 'Wired Connection'.

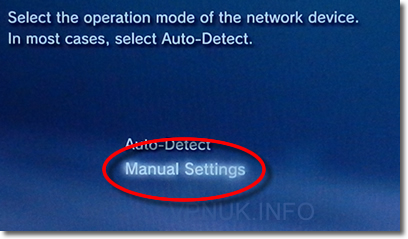
12. Manual
Select 'Manual Settings' for the operation mode.
13. IP Settings
You can skip the next few pages, stop at the 'IP Address Settings' page.
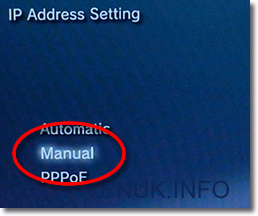
14. Manual Settings
On the IP Address Settings page, select 'Manual'.
15. Smart DNS IP
Change the 'Primary DNS' setting to the 'Smart DNS server IP'.
16. Settings
You can skip the next few pages, stop at the final 'Settings list' page.
17. Save
From the final Settings List page, press the 'X' button to save the settings
VPNUK Connection Setup Tutorial
Thats It! In order to be sure the settings are active you should Disable/Enable the internet connection or reboot your console.
Setting up a VPNUK SMART DNS connection on PS3.
Smart DNS connection on PS3 are often problematic, we therefore recommend SmartDNS connections on PS3 are carried out on a router. Click here for information: Smart DNS Router Setup
1. Registering your IP on the SmartDNS service
Login to the Client CP using your VPNUK login username and password.
2. Go to SmartDNS Menu
Go to the 'VPNUK Smart DNS' sub menu and select 'IP Address Check-in'.

3. Register IP
The Smart DNS system will reveal your current IP address, click onto the 'Enable' button, that will register that IP address on the Smart DNS service.

4. Confirmation
The Smart DNS system will confirm your IP address has been registered, it takes just a couple of minutes become enabled on the service.

5. Registered
The Smart DNS system will confirm your IP address has been registered, it takes just a couple of minutes become enabled on the service.
6. Get SmartDNS IP
Click onto the 'Smart DNS Server IP' link in the menu.

7. Copy IP
Copy or make a note of the 'Smart DNS Server IP' that you are to use, you will need this later in the setup.

8. Settings
Go to Settings -> Network Settings

9. Connection Settings
Go to 'Internet Connection Settings'.

10. Custom
Select the 'Custom' Setting method.

11. Connection Method
Select your connection method, in this tutorial we use the 'Wired Connection'.

12. Manual
Select 'Manual Settings' for the operation mode.

13. IP Settings
You can skip the next few pages, stop at the 'IP Address Settings' page.
14. Manual Settings
On the IP Address Settings page, select 'Manual'.

15. Smart DNS IP
Change the 'Primary DNS' setting to the 'Smart DNS server IP'.
16. Settings
You can skip the next few pages, stop at the final 'Settings list' page.
17. Save
From the final Settings List page, press the 'X' button to save the settings
VPNUK Connection Setup Tutorial
Thats It! In order to be sure the settings are active you should Disable/Enable the internet connection or reboot your console.


