
My PS3 Model:
Show SpoilerHide Spoiler

--So now click on the 'Your motherboard pinout diagram' link above under 'Identification'. And now just find any picture with your board type and click on it. Now hopefully your board type is labeled. If its labeled then that's great. If not, then let me know and I will try to get help from other people, or just reply and someone is bound to help you")
--Now that you have your boards pinout open, you see you have many points labeled. The main points you are going to be focusing on is "Tristate" and "GND". If you have those labled then you are on the right track.
My Board pinout:
Show SpoilerHide Spoiler

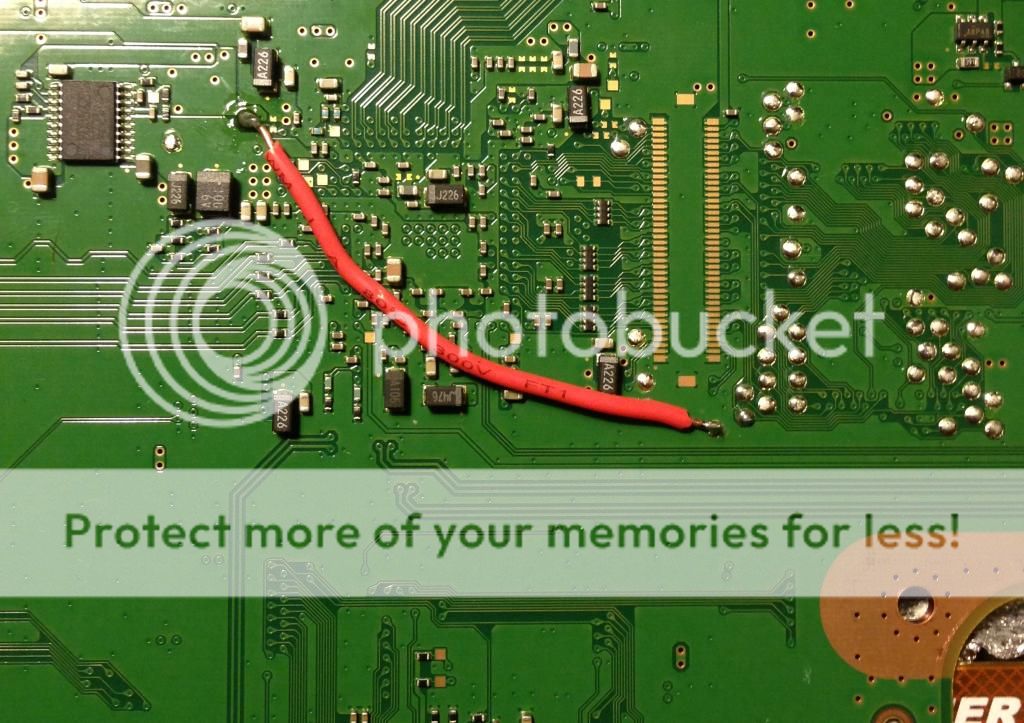
2)Soldering!
--Now I cannot tell you how to solder, but all I can tell you is you solder one end of the wire to the Tristate and the other end to any one of the GND. Once you solder those together, connect your E3 Flasher. Now assemble the PS3 back. *make sure all wires and ribbons are connected correctly*
Here is my board soldered:
Show SpoilerHide Spoiler
3)Now we go to the computer!
--Once you downloaded 'PS3 Nor and Nand Auto Patcher v0.04' put your PS3 Nor dump in the same folder as the patcher.
--Simply drag and drop your dump on the patcher .exe and it should open the CMD and start the patching.
--Now in the same folder there should be a new .bin called "bkpps3_NOR_patched.bin" .
--Put your MicroSD into your computer using a USB adapter and make sure it is formatted.
--Now put "bkpps3_NOR_patched.bin" in to the root of the MicroSD
--Once "bkpps3_NOR_patched.bin" is in the root of the MicroSD, just rename it to "bkpps3.bin"
4)To the PS3
--Put the MicroSD into the E3 Flasher, make sure all the switches are down except the first one. It should be on "Flash Fun'
--Turn on the PS3. Now you shouldn't hear the 5 beeps and the console should sound as if its working perfectly. Still there will be no display, so don't worry.
--Press Start on the E3 Flasher and wait till the Blue LEDs all light up (this might take 4+ minutes)
--Once all LED light up, and the E3 flasher is back into standby just shut down the PS3.
--Disassemble the PS3 again, and now remove the wire you soldered on Tristate and GND.
--Once the wire is removed, assemble the PS3 back again.
5)Now turn the PS3 on as normal.
--A)If you get the screen that says connect the controller, just connect the controller and update your PS3 to the "3.55 Rogero Downgrade RSOD.pup" (Make sure you rename 3.55 Rogero Downgrade RSOD.pup" to "PS3UPDAT.PUP"
--B)If you get a blank screen, and a solid yellow light on your PS3, just turn off the PS3 and put it into Recovery mode. You do that by holding the power button until the PS3 shuts off again. Then you hold onto the power button again, but only this time you release when you hear two quick beeps.
--Now you should see it in recovery mode, just scroll to system update and update to "3.55 Rogero Downgrade RSOD.pup"
6)Finally!
--You finally got to see your beautiful XMB again!your not quite done yet though. Make sure you have QA Toggle enabled, once you ensure that put the 3.55 OFW in a USB and do a system update to 3.55.
--After you successfully are back on OFW 3.55, you can download whichever CFW you would like to go on, and simply update to that. and now your DONE!
-There might be simpler solutions to this, but I'm explaining what I did to make this work.-
-I'm not a pro at making tutorials, if I forgot something please let me know.-
-If you have any other points where you get stuck, please quote me below and I will try to assist you.-
-This might be a simple walk through for some, but some people noob or not face points at where they get stuck, and this was made for them. -
Show SpoilerHide Spoiler
--So now click on the 'Your motherboard pinout diagram' link above under 'Identification'. And now just find any picture with your board type and click on it. Now hopefully your board type is labeled. If its labeled then that's great. If not, then let me know and I will try to get help from other people, or just reply and someone is bound to help you
--Now that you have your boards pinout open, you see you have many points labeled. The main points you are going to be focusing on is "Tristate" and "GND". If you have those labled then you are on the right track.
My Board pinout:
Show SpoilerHide Spoiler
2)Soldering!
--Now I cannot tell you how to solder, but all I can tell you is you solder one end of the wire to the Tristate and the other end to any one of the GND. Once you solder those together, connect your E3 Flasher. Now assemble the PS3 back. *make sure all wires and ribbons are connected correctly*
Here is my board soldered:
Show SpoilerHide Spoiler
3)Now we go to the computer!
--Once you downloaded 'PS3 Nor and Nand Auto Patcher v0.04' put your PS3 Nor dump in the same folder as the patcher.
--Simply drag and drop your dump on the patcher .exe and it should open the CMD and start the patching.
--Now in the same folder there should be a new .bin called "bkpps3_NOR_patched.bin" .
--Put your MicroSD into your computer using a USB adapter and make sure it is formatted.
--Now put "bkpps3_NOR_patched.bin" in to the root of the MicroSD
--Once "bkpps3_NOR_patched.bin" is in the root of the MicroSD, just rename it to "bkpps3.bin"
4)To the PS3
--Put the MicroSD into the E3 Flasher, make sure all the switches are down except the first one. It should be on "Flash Fun'
--Turn on the PS3. Now you shouldn't hear the 5 beeps and the console should sound as if its working perfectly. Still there will be no display, so don't worry.
--Press Start on the E3 Flasher and wait till the Blue LEDs all light up (this might take 4+ minutes)
--Once all LED light up, and the E3 flasher is back into standby just shut down the PS3.
--Disassemble the PS3 again, and now remove the wire you soldered on Tristate and GND.
--Once the wire is removed, assemble the PS3 back again.
5)Now turn the PS3 on as normal.
--A)If you get the screen that says connect the controller, just connect the controller and update your PS3 to the "3.55 Rogero Downgrade RSOD.pup" (Make sure you rename 3.55 Rogero Downgrade RSOD.pup" to "PS3UPDAT.PUP"
--B)If you get a blank screen, and a solid yellow light on your PS3, just turn off the PS3 and put it into Recovery mode. You do that by holding the power button until the PS3 shuts off again. Then you hold onto the power button again, but only this time you release when you hear two quick beeps.
--Now you should see it in recovery mode, just scroll to system update and update to "3.55 Rogero Downgrade RSOD.pup"
6)Finally!
--You finally got to see your beautiful XMB again!your not quite done yet though. Make sure you have QA Toggle enabled, once you ensure that put the 3.55 OFW in a USB and do a system update to 3.55.
--After you successfully are back on OFW 3.55, you can download whichever CFW you would like to go on, and simply update to that.
and now your DONE!-There might be simpler solutions to this, but I'm explaining what I did to make this work.-
-I'm not a pro at making tutorials, if I forgot something please let me know.-
-If you have any other points where you get stuck, please quote me below and I will try to assist you.-
-This might be a simple walk through for some, but some people noob or not face points at where they get stuck, and this was made for them. -
