
So I didnt notice a thread on here about this so I thought I would make a tutorial on an XK3Y Installation Guide.
NOTE: I am not responsible If you mess up If you mess up I can try to help you but I follow this tutorial and you should be fine.
A few more things there Is many places to buy an XK3Y as there Is a lot of Resellers you can find them mainly on the XK3Y Buy It Page I personally bought mine from Mod Suppliers but Just go on the XK3Y Buy It page and there Is a list of sellers.
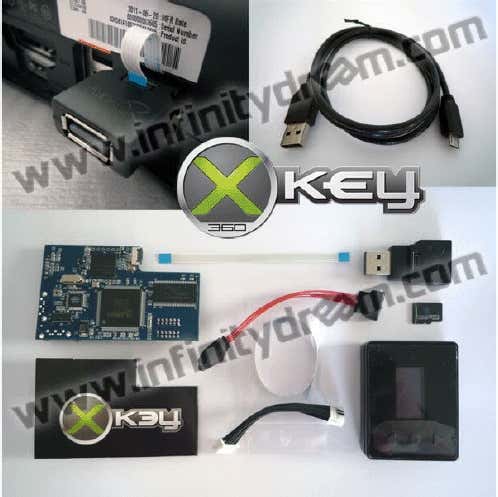
One Set should include
1x Main Board
1x Remote
1x Micro SD card
1x SATA Cable
1x Power Cable
1x USB to Micro USB cable
1x FFC/USB Dongle
1x Short FFCable
1x Long FFCable
1x Main board protection card
1x Serial Number with verification string (attached to the back of the Remote)
NOTE: For anyone who asks the XK3Y Remote Is optional to buy on the sellers websites. Me personally I did not buy the remote as I Just use ISO Menu but you can If you want.
Part 1 - Installation
Installing The XK3Y In your Xbox 360
Step By Step with Images
1. Place the MicroSD in the Xkey then connect the cables from the motherboard to Xkey
2. Connect the provided cables to the drive (SATA + power)
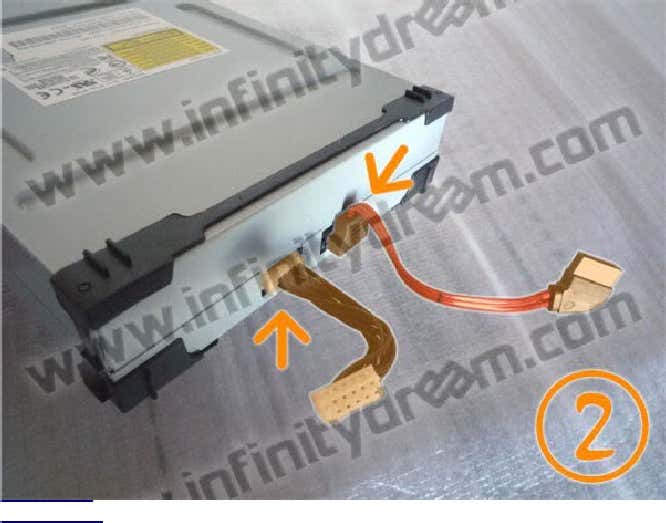
3. Place the drive so that the cables run below the Xkey
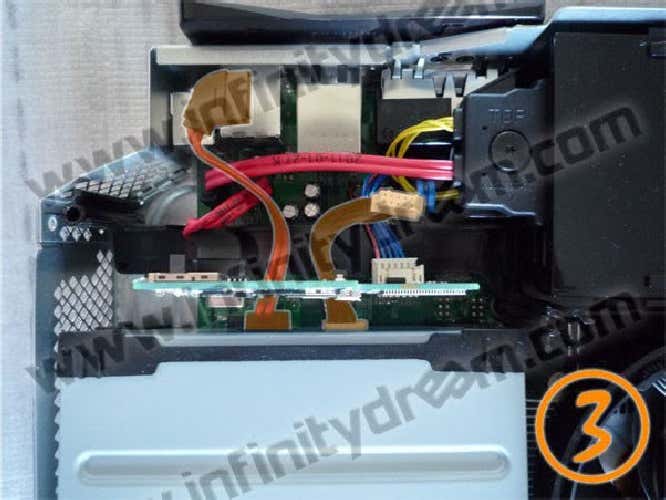
4. Connect the drive cables to Xkey
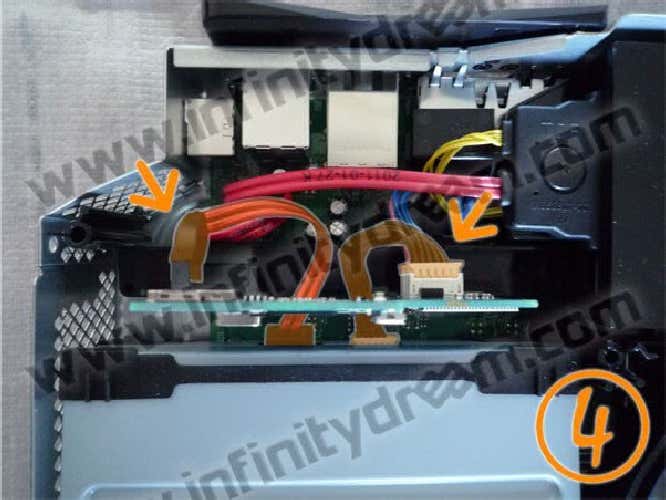


5. Connect the ribbon (Flexible Flat Cable) to Xkey
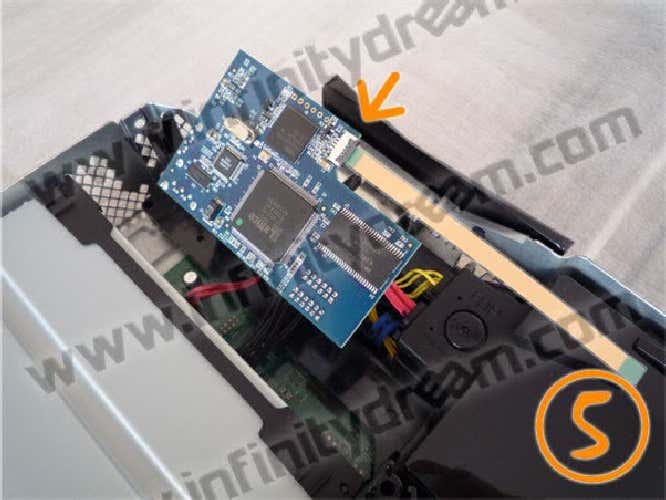
Be aware the blue side of the flat cable facing to


6. Insulate the 07(essential on Slim)
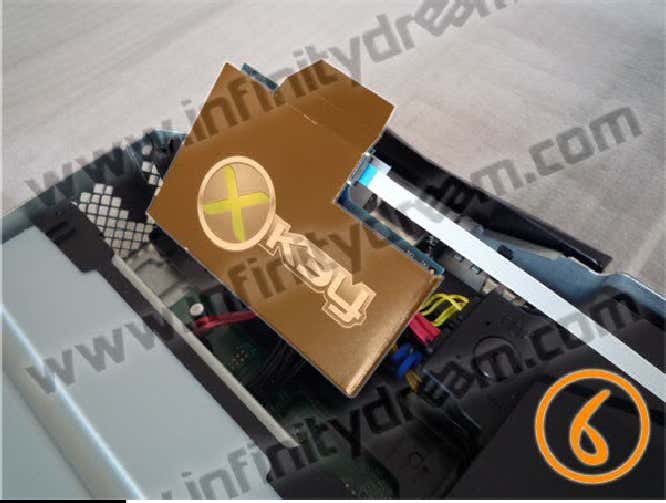
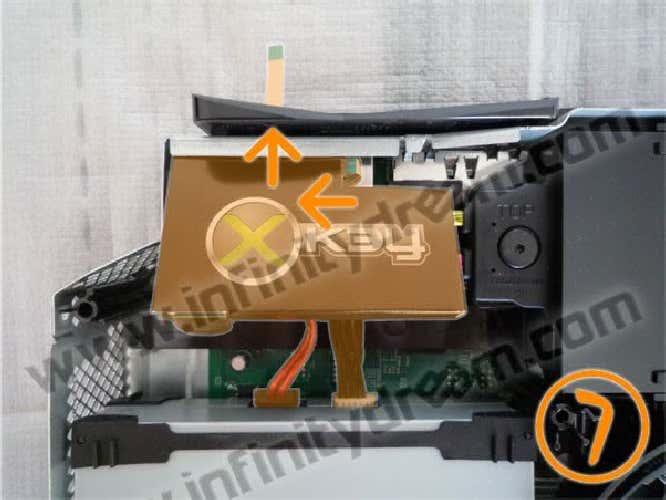
7. Pass the ribbon through the USB slot (blue side visible) then accommodate the Xkey in the corner of the metal cage
8. Replace the drive in original position
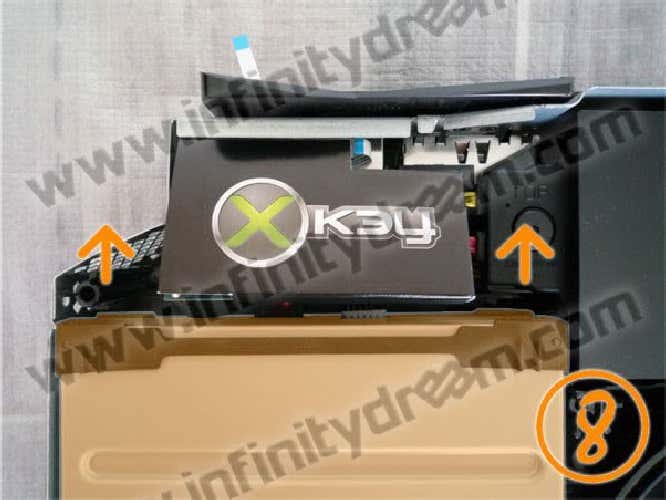
9. Ensure that the Xkey is well positioned and the ribbon is not pinched during reassembly of the upper shell
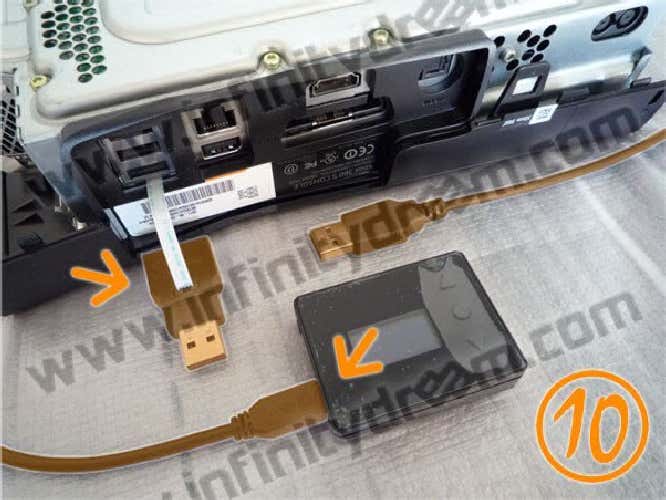
10. Connect the external part of the ribbon to the Xkey USB dongle then connect the USB cable to theXkey remote
-> BE CAREFUL TO THE***** RIBBON/USB DONGLE ASSEMBLING = RISK OFSHORT CIRCUIT !!
11. Connect the dongle to the USB plug and then connect the USB cable to the dongle... Switch on the console by power button to check the proper functioning of Xkey (= select menu OK) then close the console config of firmware file
http://htmlimg3.scribdassets.com/5m5t5zmw8w1acx75/images/19-b38ee519f4.jpg
Solution 2 using remote control to select your games:
http://htmlimg2.scribdassets.com/5m5t5zmw8w1acx75/images/20-40297deed3.jpg
Solution 3 using Wifi dongle:http://htmlimg4.scribdassets.com/5m5t5zmw8w1acx75/images/22-8948a63897.jpg
I hope you enjoyed the Tutorial I will try to update this as Much as possible and If you need any help you can always Message Me Thank You
Source: Xk3y User Manual
NOTE: I am not responsible If you mess up If you mess up I can try to help you but I follow this tutorial and you should be fine.
A few more things there Is many places to buy an XK3Y as there Is a lot of Resellers you can find them mainly on the XK3Y Buy It Page I personally bought mine from Mod Suppliers but Just go on the XK3Y Buy It page and there Is a list of sellers.
One Set should include
1x Main Board
1x Remote
1x Micro SD card
1x SATA Cable
1x Power Cable
1x USB to Micro USB cable
1x FFC/USB Dongle
1x Short FFCable
1x Long FFCable
1x Main board protection card
1x Serial Number with verification string (attached to the back of the Remote)
NOTE: For anyone who asks the XK3Y Remote Is optional to buy on the sellers websites. Me personally I did not buy the remote as I Just use ISO Menu but you can If you want.
Part 1 - Installation
Installing the xk3y us as simple and opening your 360, fixing the xk3y device into position, applying your firmware to the supplied micro sd card, and closing your console.
Dumping your dvd drive key/firmware files
Before you start: Installing the xk3y is easy. However, you need your DVD drive information. The DVD drive in the 360 encrypts game data from the DVD drive back to the 360. The information is encrypted with a unique ‘key’. To install the xk3y, you will need this key so that the xk3y can talk to your 360 in the same manor that your DVD drive does.For those who don’t know how to dump their drive key or who aren’t getting someone else to do it for them, you will need either the Maximus 360 Lizard or X360USB Pro. The Xk3y team recommends the Maximus Lizard as it dumps more information on Slims than the x360usb pro does. The Maximus team also helped out the xk3y team with the dumping of firmware on the new DVD drive to make the xk3y compatible with more DVD drives.If you are not familiar with these tools, you will need to read the tutorials that their developers provide.The tools are quite expensive - if you are only going to install 1 unit you might want to pay someone to extract your DVD drive information as with the correct tools it does not take long.
Opening xbox While using opening tools are not necessary, they are cheap and can save you a lot of time and effort to open your console.
Once the console is open, you will will need to extract your DVD drive information
Configuring the firmware on your microSD card
The supplied micro SD card is roughly 128mb in size. This 128mb is split into 3 different partitions:
1. BootINIT sector
2. Ext3 sector (this contains rootfs and uImage, the xk3y firmware files). You will not be able to see this in anon linux machine. If you want to update these files there is no need to see this partition, you can update your xk3y via a USB, and the xk3y will copy these files onto this partition for you.
3.a 0.98mb Fat32 partition. This is where you put your firmware.bin or dummy.bin to configure the xk3y.
To transfer files to your microSd card you can use either a USB microSd card reader, an SD card adapter (and then an SD card reader) or you can use a device such as a mobile phone.
Slim 360 firmware configuration
To configure your xk3y on a slim 360, all you need to do is drop your dummy.bin file on the root of your microSD card. Please ensure you safely remove your
●Maximus Lizard users: The file that is made by the lizard is called
source_dummy.bin
- All youneed to do is rename this to
dummy.bin
●USB Pro/Jungle Flasher users: The file that is created is already called
dummy.bin.
However,there are some small differences between some DVD drives that have the same firmware. For example there are up to 7 or so variations of the 0225 slim DVD drive. Unfortunately the xk3y is unable to automatically configure itself based on small bits of missing information from Jungle Flasher dumps. The missing information is not enough to cause e64 errors (no DVD or wrong DVD drive detected) but it can cause 360 games to not load...or load sometimes and not others.The fix is to add a parameter on a file called xkey.cfg. This can be done after installation iscomplete via USB. More details are below in the xkey.cfg section (insert bookmark here)Please note that the first DVD drive that was in the 360 (Hardware Liteon DG16D4S, Firmware 9504)was updated in mid 2011 with a Microsoft firmware update. The Firmware changes from 9504 to 0272.It is important that you dump the firmware after this update. If you have an old dump of your firmware(i.e. 9504) and you use this to configure your xkey, newer XGD3 games will not work on your system.
Phat 360 firmware configuration
Configuring the xk3y on your Phat console is a little bit more technical. Instead of a partial dump of thedrive needed (like slim 360s) a
full OFW (original firmware)
dump is needed. If you only have, or areonly able to make a partial dump of your firmware, OR if you have CFW (custom firmware) on your drive you can just convert the dump into the format that the xk3y accepts.The file needs to be called
firmware.bin
You cannot simply rename the file you have to firmware.bin, as mentioned it MUST be a full original firmware dump, and on top of that it must be after the Mid 2011 update from microsoft. If not you willget an e64 error. To convert your dump into the correct format you will need to download the file below, which is a program called jungle flasher. Included in the program in the firmware folder are the appropriate firmware files needed for all phat 360s.
Ok so first lets start with dumping the firmware for a Phat Xbox 360.
you can find Jungle Flasher on a forum
Jungle Flasher is a powerful little program that has a 270 page manual. However for the purpose of the xk3y we only need to know how to use 1 feature.
1. Open up JungleFlasher.exe. You may recieve an error when opening on a 64bit PC. Just ignore it.
2. On the FirmwareTool32 tab, click on Open Source firmware button
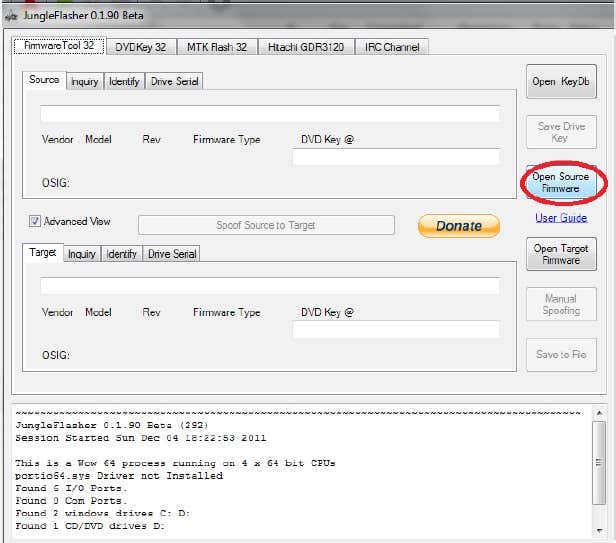
3. Navigate to your firmware file. It should be 256KB in size. For demonstration purposes we will be using a file for a liteon drive.
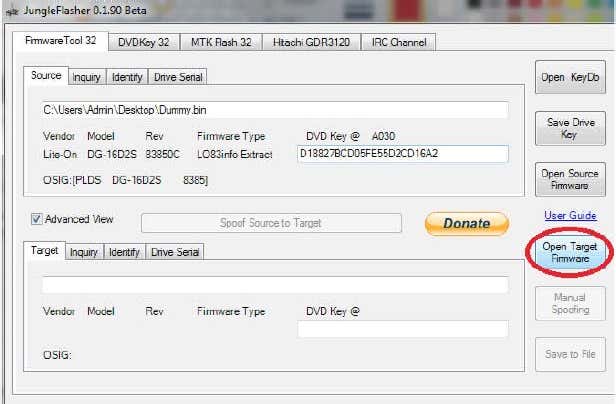
4. After it has been opened your information will appear in in the top panel. The next step is to open upa full original dump, the target firmware. This is the file you want to convert your DVD dump into. Thefiles are located in a folder called firmware which is located in the Jungle Flasher folder. Inside thisfolder there is a folder called Stock Firmware.
Inside this folder there are 4 folders●BenQ●Hitachi (Phat)●Liteon (Phat)●Samsung.These are the 4 different companies that made DVD drive types of the Phat 360. You can see whatDVD drive you have by looking at the text under Vendor on the tab you are currently on, or by simplylooking at the large sticker that is on your DVD drive. If your drive is BenQ, then you must chooseBenQ, if your drive is Samsung you must choose Samsung, if your drive is Liteon you must chooseLiteon and if your drive is Hitachi, you must use one of the Hitachi files (there are 15 different types!).The original file you are opening is located in the respective folder, and then usually inside the“Post_13141” folder.
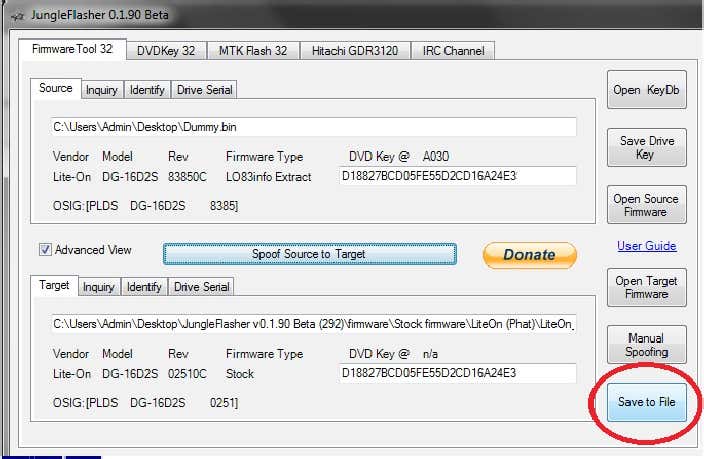
5. Once you have opened the file, your screen should look similar to this. With your DVD driveinformation up the top, and an original dump down the bottom. All you need to do now is press Spoof to Target.
This will copy all of your DVD drive information into full firmware dump which is what thexk3y needs to work. Once you click the button you will see the DVD Key change from
FFFFFFFFFFFFFFFF
into your DVD Key.
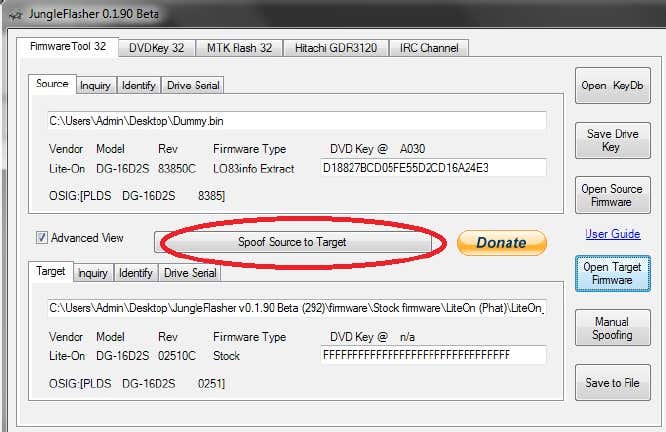
6. The last step is to click Save to File.
Save the file under the name firmware.bin the name must be in lowercase. Save it onto your PC for safe keeping, and then you will need to transfer thi file onto your xk3y MicroSD card on the 0.98mb Fat32 partition.
NOTE: Make sure you save your file as firmware.bin to the MicroSD card else this will not work!
you can find Jungle Flasher on a forum
Jungle Flasher is a powerful little program that has a 270 page manual. However for the purpose of the xk3y we only need to know how to use 1 feature.
1. Open up JungleFlasher.exe. You may recieve an error when opening on a 64bit PC. Just ignore it.
2. On the FirmwareTool32 tab, click on Open Source firmware button
3. Navigate to your firmware file. It should be 256KB in size. For demonstration purposes we will be using a file for a liteon drive.
4. After it has been opened your information will appear in in the top panel. The next step is to open upa full original dump, the target firmware. This is the file you want to convert your DVD dump into. Thefiles are located in a folder called firmware which is located in the Jungle Flasher folder. Inside thisfolder there is a folder called Stock Firmware.
Inside this folder there are 4 folders●BenQ●Hitachi (Phat)●Liteon (Phat)●Samsung.These are the 4 different companies that made DVD drive types of the Phat 360. You can see whatDVD drive you have by looking at the text under Vendor on the tab you are currently on, or by simplylooking at the large sticker that is on your DVD drive. If your drive is BenQ, then you must chooseBenQ, if your drive is Samsung you must choose Samsung, if your drive is Liteon you must chooseLiteon and if your drive is Hitachi, you must use one of the Hitachi files (there are 15 different types!).The original file you are opening is located in the respective folder, and then usually inside the“Post_13141” folder.
5. Once you have opened the file, your screen should look similar to this. With your DVD driveinformation up the top, and an original dump down the bottom. All you need to do now is press Spoof to Target.
This will copy all of your DVD drive information into full firmware dump which is what thexk3y needs to work. Once you click the button you will see the DVD Key change from
FFFFFFFFFFFFFFFF
into your DVD Key.
6. The last step is to click Save to File.
Save the file under the name firmware.bin the name must be in lowercase. Save it onto your PC for safe keeping, and then you will need to transfer thi file onto your xk3y MicroSD card on the 0.98mb Fat32 partition.
NOTE: Make sure you save your file as firmware.bin to the MicroSD card else this will not work!
NOTE: MAKE SURE YOU EJECT THE MICRO SD CARD SAFELY BY RIGHT CLICKING THE ICON AND CLICK REMOVE SAFELY ELSE THIS COULD CORRUPT YOUR SD CARD
Now for The Xbox 360 Slim It Is slightly different firstly guys before you can do this with a Slim you must make sure your console was made before November 2011 or else your DVD Drive will be a DG-16D5S which will need an RGH Is your console was made before November 2011 then your DVD Drive will be a DG-16D4S which Is exactly what you need. You can check when your console was made by looking at the back of the console on the little sticker It will say MFR Date: Make sure the MFR Date Is before November 2011!
Ok so I currently dont have any Images for this yet so you will have to follow my text tutorial but Its best If you google how to get the dummy.bin from a Sim DVD Drive Im sure there Is alot more in depth tutorials
1.Start up Jungle Flasher Connect your DVD Drive to Jungle Flasher now there Is multiple ways of doing this by using the USBProV2 or The Maximus Lizzard Just look up a tutorial on how to use these tools Im sure the Is a more In depth tutorial
2.Now your drive Is connected go to the DVD Key 32 Tab and click Slim Key
3. Now you will be prompted a Message saying do you wish to unlock the sim pcb or something like that click no
4.Now your drive will go Into Vendor Mode and It will start obtaining your Key from the Drive
5. Now once It has got your Key It will ask you to save a bunch of files save them to your Desktop and click yes to all of them
6. Now close off Jungle Flasher It will ask you to save a JF Log (Jungle Flasher Log) Just click yes and now there should be a file on your desktop or wherever you saved them to called dummy.bin that Is the file you are going to need for your XK3Y
7.Plug In your Micro SD Card to your computer using an old camera or an SD Card Reader and place the Dummy.bin on the Micro SD Card
8.Safely eject the MicroSD Card from the Computer using the little icon and right clicking on It and clicking remove safely
Congratulations you have now dumped the Slim Firmware
Now I know The Xbox 360 USB Pro V2 and the Maximus Lizzard can be quite expensive and pricey thats why Im bringing you the cheaper method and here Is how to do It
Things You Need:
1.VIA6421 PCI controller Card
2.USB to IDE/Sata cable
3.PC (With PCI Slot on Board)
4.Liteon 9504/0272 or 0225 Drive
Step 1) OK, make sure your 360 Phat or 360 Slim is ready and hook the power molex to the 0225 drive.
Step 2) Connect the USB 2 IDE/SATA cable to the back USB port of the 360 .
Step 3) Conect the SATA data cable to the SATA port of the 0225 drive.
Step 4) Connect the other end of the SATA data cable to the SATA port of the USB 2 IDE/SATA cable
Step 5) Turn on the 360 by turning it on the usual way. Touching of course....
Step 6) Now eject the DVD tray via the eject button and then press the button again to close the tray
step 7) Now disconnect the SATA data cable from the SATA port or the USB 2 IDE/SATA cable, leaving the other end still connected to the 0225 drive and connect the SATA cable to your VIA VT6421A PCI controller. Make sure to use the right SATA port on the controller.
Step 8) Now open Jungleflasher v0.1.86 beta and select the DVDKey 32 tab. (If using Vista or Windows 7 make sure to run program as administrator) Make sure that the Dumpt .bin only file is NOT selected. This tutorial will help you to retrieve your dummy.bin, key, inquiry, serial, and identity key.
Step 9) Make sure that the drive is detected then press the "SlimKey" option.
Step 10a) Another window should then pop up asking if you want to send unlock to slim, make sure to choose "No".
Step 10b) Jungelflasher should then start the process of retrieving the key.
Step 11) Once it is done, make sure that it lists the key and that the key is verified
Step 12) Once verified and all checks out you will be asked to save all files.
(Make sure to save all windows that pop up.)
step 13) once done -- click 'outra /ATA reset''
Step 14) Close Jungle flasher and save the JF log file.
Now do the whole process again and save the bin files to another folder, close ot and make sure to save the JF log file and compare each JF log file to make sure the keys match. Do it three times or more if you want but make sure you have the right key cause without the key you will end up with a 360 DVD player if anything goes wrong and renders the 0225 drive inoperable.
Thats it, you just dumped your files and saved them.
Here Is the Video Just Incase Text Tutorials are not your thing
Installing The XK3Y In your Xbox 360
Step By Step with Images
1. Place the MicroSD in the Xkey then connect the cables from the motherboard to Xkey
2. Connect the provided cables to the drive (SATA + power)
3. Place the drive so that the cables run below the Xkey
4. Connect the drive cables to Xkey
5. Connect the ribbon (Flexible Flat Cable) to Xkey
Be aware the blue side of the flat cable facing to
6. Insulate the 07(essential on Slim)
7. Pass the ribbon through the USB slot (blue side visible) then accommodate the Xkey in the corner of the metal cage
8. Replace the drive in original position
9. Ensure that the Xkey is well positioned and the ribbon is not pinched during reassembly of the upper shell
10. Connect the external part of the ribbon to the Xkey USB dongle then connect the USB cable to theXkey remote
-> BE CAREFUL TO THE***** RIBBON/USB DONGLE ASSEMBLING = RISK OFSHORT CIRCUIT !!
11. Connect the dongle to the USB plug and then connect the USB cable to the dongle... Switch on the console by power button to check the proper functioning of Xkey (= select menu OK) then close the console config of firmware file
Connecting your xkey
Solution 1 using ISOmenu to select your games:
http://htmlimg2.scribdassets.com/5m5t5zmw8w1acx75/images/18-51f957f212.jpg
Solution 1 using ISOmenu to select your games:
http://htmlimg2.scribdassets.com/5m5t5zmw8w1acx75/images/18-51f957f212.jpg
http://htmlimg3.scribdassets.com/5m5t5zmw8w1acx75/images/19-b38ee519f4.jpg
Solution 2 using remote control to select your games:
http://htmlimg2.scribdassets.com/5m5t5zmw8w1acx75/images/20-40297deed3.jpg
Solution 3 using Wifi dongle:http://htmlimg4.scribdassets.com/5m5t5zmw8w1acx75/images/22-8948a63897.jpg
Part 2 - Changing settings with xkey.cfg
The Xk3y makes use of a config file called xkey.cfg to change settings on the device. The reason why there
is no on screen menu on the remote to change settings is to ensure that users don’t accidentally change
settings, and that new settings can be rolled out by the xk3y team without making changes to the navigation
of the menu.
A demo of the xkey.cfg file can be downloaded with every firmware upgrade. You can easily edit this file, or
you can make your own using any text editor like notepad.
Once the changes have been made you need to update your xk3y. The update will only take 1 second due to
the size of the file
Please note that the xkey.cfg is just a text file. Due to the way linux reads files files, if you are making your
own file (i.e. not editing the supplied example file) you need 3 x carriage returns at the end of the file. This
means you need to press the ENTER key on your keyboard 3 times right at the end of the file and then save
the file. If you do not have these 3 lines the xk3y will not read the last 3 lines of your file.
There are certain values that can be changed in the xkey.cfg file.
LANGUAGE=
The LANGUAGE parameter will change the language on the xk3y menu screen. Please note that Chinese
xk3y cannot have their language changed. The default language is English.The current language posibilities
are SCN,TCN,KOR,JPN,DEU,ENG,ESP,ITA,NED,POR,SWE.
For example if you wanted to change the language to Spanish you set
LANGUAGE=ESP
MENUISO=
MenuISO is a feature that will allow users to select ISO files from the xbox 360 dashboard, instead of the
supplied screen. The feature will default to being off, to turn the feature on please set
MENUISO=Y
To use this feature, wait for your harddrive to be detected by the xk3y. Once it is detected all you need to
do is eject your DVD drive (pressing the eject button on your console OR just pressing A on the DVD drive
panel on your 360 dashboard). The xk3y will fake open the tray, load MenuISO, and then close the tray. You
can then navigate to the Picture Library no your 360. This is locted under ‘Apps’ → ‘My apps’ → ‘picture
viewer’. Or even easier, click the xbox button (in the middle of your controller, go to media (press RB on
controller) and then go to picture viewer. Click on current disc, and choose your ISO from there. When the
screen says ‘Eject to load’ you then Eject your DVD drive again, and the game will automatically load.
The easiest way to eject is to press the XBOX button on your controller, then Y, and then Y again. This method
of selecting games is based off a little software exploit and can be blocked by any time with an update. If it is
blocked you will just need to choose the game from the screen.
If you are playing a Multi Disc game, and the 360 requests for you to insert another disc, you cannot select
the game from the menu, you will need to select the 2nd game from the xk3y screen. Every time you press
eject the xk3y will load the special menuISO, so you need to press the eject button twice quickly (within 1
second) and choose the 2nd game from the xk3y screen.
If you are using the xk3y wifi dongle, then please keep MENUISO disabled.
ALTSLIMFW=
This parameter is for slim consoles that have been dumped with Jungle flasher. If you have a Phat console
or a Slim console leave the value as ALTSLIMFW=0
For Slim consoles that say 0225 in Jungle Flasher but are 9504 labeled use the value ALTSLIMFW=7
For Slim consoles that say 0401 in Jungle Flasher but are 0225 labeled use the value ALTSLIMFW=8
For all other slim consoles, if you get errors when trying to launch a game ISO (like play DVD) try values from
1 to 6.
If you do not get errors then do not change the default value of 0.
SSID=
This is a xk3y Wifi setting, and is explained in the Wifi section.
PSK=
This is a xk3y Wifi setting, and is explained in the Wifi section.
WEP=
This is a xk3y Wifi setting, and is explained in the Wifi section.
IP=
This is a xk3y Wifi setting, and is explained in the Wifi section.
NETMASK=
This is a xk3y Wifi setting, and is explained in the Wifi section.
KEY=
This is a xk3y Wifi setting, and is explained in the Wifi section
WiFi dongle
If you bought a WiFi dongle, you also received a unique identifier for this dongle.
This key has to be pasted in the xkey.cfg in the following way:
KEY=YOUR_DONGLES_UNIQUE_ID
29This isn’t the only thing that has to be changed in the xkey.cfg. For the xk3y to know to which
wireless network to connect, you’re going to have to add the following to the xkey.cfg as well:,
depending on your Wifi settings:
SSID=YOUR_NETWORK_BROADCAST_ID
PSK=YOUR_PASSKEY
WEP=YOUR_WEP_KEY
IP=IP_ASSIGNED_TO_xk3y
NETMASK=NETMASK_TO_USE
These are all the settings available, depending on your Wifi settings, change the following:
● I have a WEP protected network with DHCP
Enter the SSID field and the WEP field (WEP must be in hexadecimal format) and remove
the other fields.
● I have a WPA protected network with DHCP
Enter the SSID field and the PSK field, remove the other fields.
● I have an unprotected network with DHCP
Only enter the SSID field, remove the other fields.
● I want a specific IP/netmask to be used with my xk3y
Enter one of the above 3 options, then enter the IP field with your desired IP. The default
255.255.255.0 netmask will be used. If you wish to use another netmask, enter that field as
well. Otherwise remove it.
Update your xkey.cfg like you would usually do.
(If you can’t connect, head over to Trouble Shooting)
In order to be able to use the dongle you’re also going to be needed a USB Hub, so you can have
both your HDD and dongle connected to the xk3y.
- Connect your USB Hub to the xk3y.
- Connect your HDD to one of the USB ports.
- Connect your WiFi dongle to another USB port.
Now just power on your Xbox and wait for the remote to say “NETWORK OK”. The IP that has been
assigned to the xk3y can be found in the “About” screen near the bottom.
Enter this IP in the URL bar of a web browser and you’ll be presented with the Web Interface.
WiFi Interface
The WiFi interface is compatible with any browser that supports AJAX. It is recommended that you
use a somewhat modern device to select games with.
30If you don’t have a cover for a certain game, it will show a replacement image instead.
If you have multiple HDD’s connected to the xk3y, it will give you one interface to select from all of
them.
Cover Slide
Only use this on fast devices, you can always try to use it on a slower device, but the result might
disappoint you.
If you’re using a touch based device, you can double tap the panel to go full screen. If that doesn’t
work, or if you’re not using a touch based device, there’s also a button in the top left corner that will
allow you to enter and exit fullscreen.
If you’re using a touch based device, you can swipe to change covers. If that doesn’t work, or if
you’re not using a touch based device, you can click/tap the sides of the panel to switch covers.
Alternatively you can also click/tap the covers in the bottom row.
When you’ve decided which game you want to play, you can click/tap the “Play” button in the top. It
will load the game and bring up a dialog with a message based on your tray state and if you already
have a game loaded. If a game is not loading, it is advised that you read this message.
Alphabetic Selection
This is the simplest selection method. All your games will be alphabetically listed and you can use
the filter bar at the top to search for a specific game.
When you’ve decided which game you want to play, you can click/tap the game. It will load the
game and bring up a dialog with a message based on your tray state and if you already have a
game loaded. If a game is not loading, it is advised that you read this message.
Folder Structure
This will show you how you have set up the folders in your HDD. If you’ve categorised your games
by genre, you can easily select them from here. When you have more than one HDD connected
to the xk3y, and have the folder “Action” in more than one HDD, it will put all of the “Action” folders
in one. If you wish to go up a folder, you have to click/tap the “...” folder. No search function is
available here.
When you’ve decided which game you want to play, you can click/tap the game. It will load the
game and bring up a dialog with a message based on your tray state and if you already have a
game loaded. If a game is not loading, it is advised that you read this message.
About
Here you can view information about your xk3y. It will also show some information about the
interface.
I hope you enjoyed the Tutorial I will try to update this as Much as possible and If you need any help you can always Message Me Thank You
Source: Xk3y User Manual

