
Visual studios 2013 http://www.microsoft.com/en-us/download/details.aspx?id=40778
Hey guys, today I will be teaching you how to code a client list; Also know as a Data Grid View! I will also be teaching you how to add a context menu strip and how to code in mods for all clients. Before we start, if you haven't already I really recommend reading my other tutorial: Basics of C# RTM Tool Coding Tutorial SUPER NOOB FRIENDLY! It will help you out a lot if you don't know how to code or you're just starting. This client list will work for CEX & DEX users.
First make sure that you've got a project opened, it could be one you've already been working on or one that you've just made. So now simply add a connect and attach button if you don't already have one (I'm not going to teach how to code a connect and attach button as it was in my other tutorial
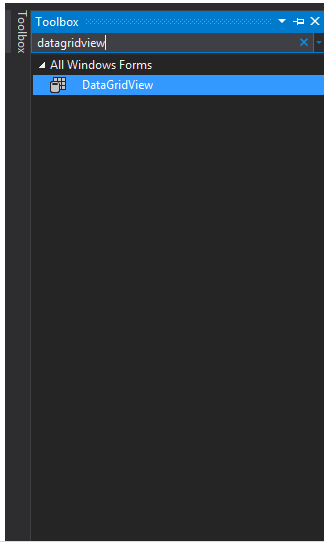
Now you want to go into your toolbox and type in "datagridview" and drag it into your tool.
Spoiler:
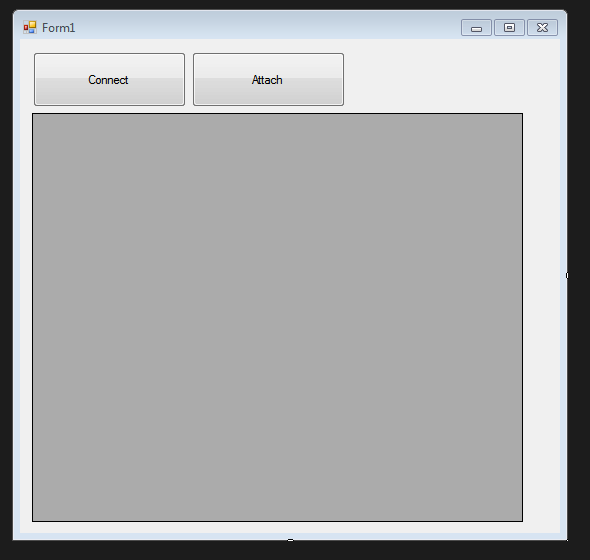
Now just adjust the dimensions, I put mine like this, but you can put it how ever you want
Spoiler:
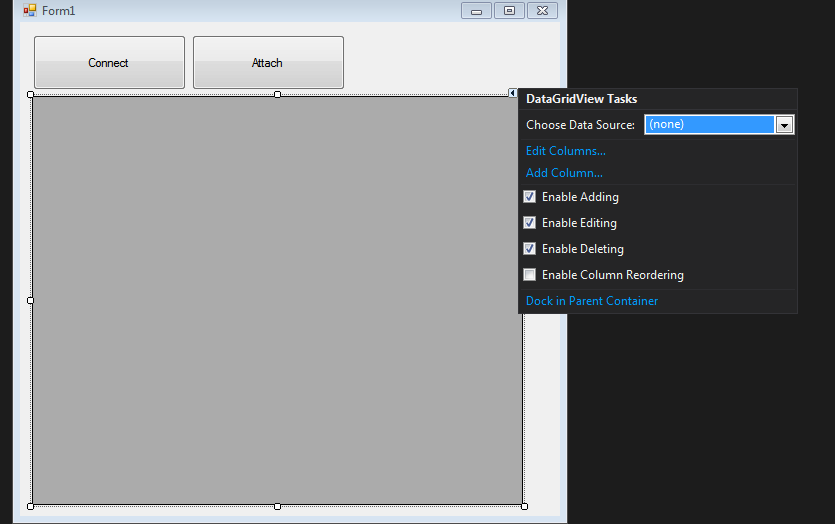
What you want to do now is click on the datagridview and on the top right of the datagridview you should see a little arrow pointing to the right, click on it and click "Add Columns"
Spoiler:
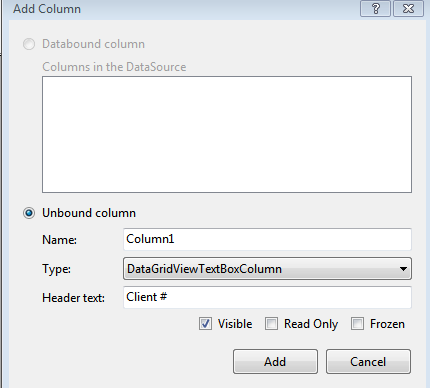
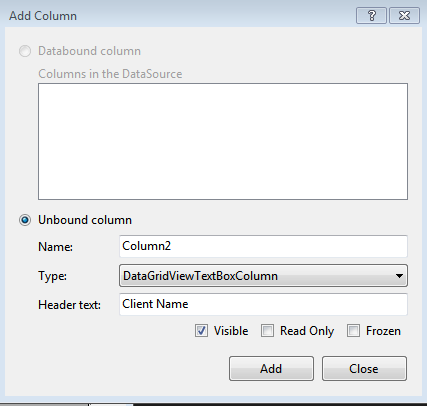
Once you've got the add columns page opened, we're now going to add 2 columns. One for the client number and the other one for the client name. So for the first column set the "Header Text" to "Client #", or you can set the header text to whatever you want. And then click "Add"
Spoiler:
Now add another column and name the "Header Text", "Client Name", then simply click "Close".
Spoiler:
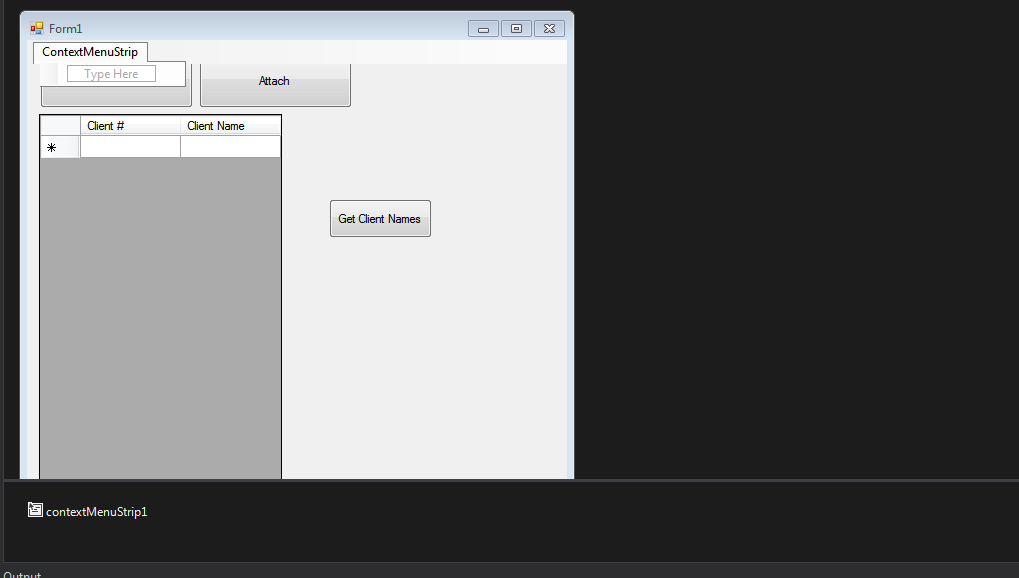
Your form should look like this now:
Spoiler:

Now we want to have a function that updates the client list's rows and adds the client numbers. So we want to make a new button named "Get Client Names" or whatever you would like it to be named and add this code into the button:
Code:
if (dataGridView1.RowCount == 1)
{
dataGridView1.Rows.Add(11);
}
for(uint i = 0; i < 12; i++)
{
dataGridView1[0, Convert.ToInt32(i)].Value = i;
}
What this code is doing is it's first checking if the datagrid's row count is 1, in this case it is 1. And if it is it will add 11 more rows. We need 12 rows in total because the maximum amount of clients in a game are 12. Then the next code is a "for loop" I'm not really going to go in depth on how it works but basically what it's doing is it starts off with an unidentified integer named "i" that's value is 0, and if i is less than 12 it will increment it by 1. And in the curly brackets "0" is the column, which is "Client #" and it updates it so every row in that column will have a number going from 0 to 11. So Column 1 row 1 will be "0", Column 1 row 2 will be "1" and so on.
Now we will be coding the actual function that gets the clients names, so put this code somewhere in your code:
Code:
public static string ClientNames(uint client)
{
string getnames = PS3.Extension.ReadString(0xF46B9C + client * 0x3700);
return getnames;
}
Basically what this function is doing is creating a public string named ClientNames with the parameter "uint client".
In the curly brackets ( { } ) there is a string named "getnames", what that string does is uses PS3Lib's extensions to read the string from the name address for each client. Then it returns the client names. "0xF46B9C" is the ghosts names address, if you're coding a datagridview for other cods find the client name offset for the game.
So now once you've got that in your code go back to the "Get Client Names" button and double click it. Right under the "dataGridView1[0, Convert.ToInt32(i)].Value = i;" code put this code:
Code:
dataGridView1[1, Convert.ToInt32(i)].Value = ClientNames(i);
"1" is the column, which in this case is "Client Names" and each row in column 1 ("Client Names") will contain each clients name. So Column 2 Row 1 will contain client 0's name, Column 2 row 2 will contain client 1's name and so on.
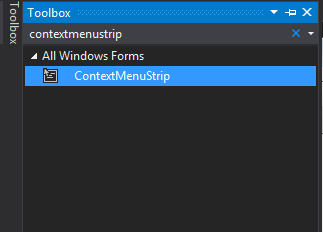
Now what we want to do is go back to the toolbox and type in "ContextMenuStrip" and drag it onto our form.
Spoiler:
Now go back to the datagridview and click on it and go to it's properties, scroll down to "ConextMenuStrip" and select "contextmenuStrip1", it should look like this:
Spoiler:
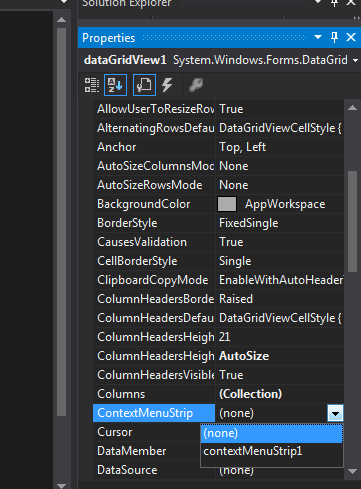
What this does is set the datagridview contextmenustrip to the one you just created, so whenever someone right clicks on the datagridview the contextmenustrip will show up.
To add functions or options to the contextmenustrip simply click on the contextmenustrip and you should see a little drop down pop up like this:
Spoiler:
Now type in anything you want, it can be "God Mode" or "Infinite Ammo" or whatever mods you want to put in, you can even have different options leading to the mods, like lets say you have God Mode, you can hover over it and have the options "On" and "Off" like so:
Spoiler:

To actually code the function, double click on the mod you put in on the contextmenustrip, and it should open up its code. Put the following code in:
Code:
PS3.SetMemory((0xE03CAA + (uint)dataGridView1.CurrentRow.Index * 0x3700), new byte[] { 0xFF, 0xFF });
or this code:
Code:
byte[] godmode = new byte[] { 0xFF, 0xFF };
PS3.SetMemory((0xE03CAA + (uint)dataGridView1.CurrentRow.Index * 0x3700), godmode);
They both do the same thing. Replace "0xE03CAA" with whatever offset you want and 0x280 with the client interval for that offset, and the bytes with whatever bytes you want it to be. What the code does is basically it declares a byte named godmode, and that byte contains "0xFF, 0xFF" and then you're setting the memory to the offset "0xE03CAA" or whatever offset you want. What it's doing with the datagridview1.currentrow.index * 0x280 is it takes the client number you've selected and adds + 0x280 as many times to the offset "0xE03CAA" until it reaches the client you've selected.
Well that's it for this tutorial, if you guys have any questions or suggestions please comment down below!
Hey guys, today I will be teaching you how to code a client list; Also know as a Data Grid View! I will also be teaching you how to add a context menu strip and how to code in mods for all clients. Before we start, if you haven't already I really recommend reading my other tutorial: Basics of C# RTM Tool Coding Tutorial SUPER NOOB FRIENDLY! It will help you out a lot if you don't know how to code or you're just starting. This client list will work for CEX & DEX users.
First make sure that you've got a project opened, it could be one you've already been working on or one that you've just made. So now simply add a connect and attach button if you don't already have one (I'm not going to teach how to code a connect and attach button as it was in my other tutorial
Now you want to go into your toolbox and type in "datagridview" and drag it into your tool.
Spoiler:
Now just adjust the dimensions, I put mine like this, but you can put it how ever you want
Spoiler:
What you want to do now is click on the datagridview and on the top right of the datagridview you should see a little arrow pointing to the right, click on it and click "Add Columns"
Spoiler:
Once you've got the add columns page opened, we're now going to add 2 columns. One for the client number and the other one for the client name. So for the first column set the "Header Text" to "Client #", or you can set the header text to whatever you want. And then click "Add"
Spoiler:
Now add another column and name the "Header Text", "Client Name", then simply click "Close".
Spoiler:
Your form should look like this now:
Spoiler:
Now we want to have a function that updates the client list's rows and adds the client numbers. So we want to make a new button named "Get Client Names" or whatever you would like it to be named and add this code into the button:
Code:
if (dataGridView1.RowCount == 1)
{
dataGridView1.Rows.Add(11);
}
for(uint i = 0; i < 12; i++)
{
dataGridView1[0, Convert.ToInt32(i)].Value = i;
}
What this code is doing is it's first checking if the datagrid's row count is 1, in this case it is 1. And if it is it will add 11 more rows. We need 12 rows in total because the maximum amount of clients in a game are 12. Then the next code is a "for loop" I'm not really going to go in depth on how it works but basically what it's doing is it starts off with an unidentified integer named "i" that's value is 0, and if i is less than 12 it will increment it by 1. And in the curly brackets "0" is the column, which is "Client #" and it updates it so every row in that column will have a number going from 0 to 11. So Column 1 row 1 will be "0", Column 1 row 2 will be "1" and so on.
Now we will be coding the actual function that gets the clients names, so put this code somewhere in your code:
Code:
public static string ClientNames(uint client)
{
string getnames = PS3.Extension.ReadString(0xF46B9C + client * 0x3700);
return getnames;
}
Basically what this function is doing is creating a public string named ClientNames with the parameter "uint client".
In the curly brackets ( { } ) there is a string named "getnames", what that string does is uses PS3Lib's extensions to read the string from the name address for each client. Then it returns the client names. "0xF46B9C" is the ghosts names address, if you're coding a datagridview for other cods find the client name offset for the game.
So now once you've got that in your code go back to the "Get Client Names" button and double click it. Right under the "dataGridView1[0, Convert.ToInt32(i)].Value = i;" code put this code:
Code:
dataGridView1[1, Convert.ToInt32(i)].Value = ClientNames(i);
"1" is the column, which in this case is "Client Names" and each row in column 1 ("Client Names") will contain each clients name. So Column 2 Row 1 will contain client 0's name, Column 2 row 2 will contain client 1's name and so on.
Now what we want to do is go back to the toolbox and type in "ContextMenuStrip" and drag it onto our form.
Spoiler:
Now go back to the datagridview and click on it and go to it's properties, scroll down to "ConextMenuStrip" and select "contextmenuStrip1", it should look like this:
Spoiler:
What this does is set the datagridview contextmenustrip to the one you just created, so whenever someone right clicks on the datagridview the contextmenustrip will show up.
To add functions or options to the contextmenustrip simply click on the contextmenustrip and you should see a little drop down pop up like this:
Spoiler:
Now type in anything you want, it can be "God Mode" or "Infinite Ammo" or whatever mods you want to put in, you can even have different options leading to the mods, like lets say you have God Mode, you can hover over it and have the options "On" and "Off" like so:
Spoiler:
To actually code the function, double click on the mod you put in on the contextmenustrip, and it should open up its code. Put the following code in:
Code:
PS3.SetMemory((0xE03CAA + (uint)dataGridView1.CurrentRow.Index * 0x3700), new byte[] { 0xFF, 0xFF });
or this code:
Code:
byte[] godmode = new byte[] { 0xFF, 0xFF };
PS3.SetMemory((0xE03CAA + (uint)dataGridView1.CurrentRow.Index * 0x3700), godmode);
They both do the same thing. Replace "0xE03CAA" with whatever offset you want and 0x280 with the client interval for that offset, and the bytes with whatever bytes you want it to be. What the code does is basically it declares a byte named godmode, and that byte contains "0xFF, 0xFF" and then you're setting the memory to the offset "0xE03CAA" or whatever offset you want. What it's doing with the datagridview1.currentrow.index * 0x280 is it takes the client number you've selected and adds + 0x280 as many times to the offset "0xE03CAA" until it reaches the client you've selected.
Well that's it for this tutorial, if you guys have any questions or suggestions please comment down below!
