Lindows
Super Moderator
Staff member
Moderator
Community Elite
Community Veteran
Determined Poster
Active Member
Console ID Poster
Hey guys!
I made a discord server just for you guys! Feel free to join. This is an online chat with a mixture of gamers and sometimes there are Console ID's posted. If you need any help I'll be more than happy to try to assist you
To Join Click Here: https://**********/8N2qZ3k
Requirement
Download Chimp and FTP the extracted version to your applications folder on the Xbox. Then copy the LINUXBOOT.CFG file to the root of the E:\ drive, and don't rename anything!
Procedure
1. Make sure your new Hard Drive jumper on the back is set to SLAVE.
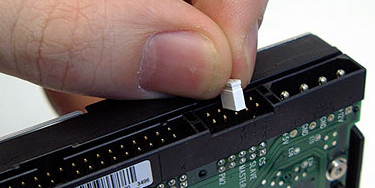
(It will vary depending on drive)
2. Open your Xbox using the Torx screwdrivers. Remove the lid.
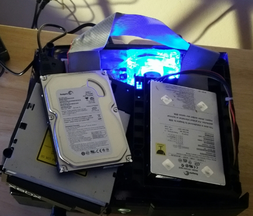
3. Make sure the mains are disconnected. Now, use the Molex splitter or external source to power both drives. So your Disk drive, Xbox HDD and New HDD has power
4. Connect your power and AV cord to your Xbox. Power on the Xbox and allow to boot into dashboard. Then disconnect the IDE cable from your DVD drive and Connect it to your new HDD
5. Launch Chimp from the Applications menu in your dashboard.
6. On the Main Menu of Chimp, select "Scan Physical IDE Devices". The system will tell you to make sure you have connected all of your IDE devices before continuing. Choose YES to continue. When it's finished make sure both drives are showing and then exit. for that screen.
7. When both HDD's are detected, choose "Clone Master to Slave". Again the system will ask you to make sure all IDE devices are connected. Choose Yes to continue. Do the clone "Full Disk".
8. This step will take a little while. The cloning process varies on time depending on how much data you have. For me it took little under 20 mins. When it is complete, choose exit to return to the menu.
9. Now, before leaving Chimp, we have to lock the drive. Choose "Lock Slave". It will now ask you where the source key is located. Choose an option from Motherboard.
10. Confirm the lock and you will be returned to the Main Menu. Now we're done. So now choose "Exit to Shell" and you will be returned to a command prompt looking thing.
11. Power off the Xbox.
12. Remove the original HDD, and Molex splitter. Set the new HDD to Master. Reconnect the IDE cable to the DVD drive and your new Hard Drive.
13. Before replacing the lid of the Xbox, power on the system and make sure it boots into the dashboard. Once is does, power down, and put it back together.
Congrats your Xbox Hard Drive is now upgraded!
=-----------------------------------------------------------------------------------------------------------------------------------------=
I made a discord server just for you guys! Feel free to join. This is an online chat with a mixture of gamers and sometimes there are Console ID's posted. If you need any help I'll be more than happy to try to assist you
To Join Click Here: https://**********/8N2qZ3k
Requirement
- Softmodded Xbox
- Xbox controller (Duke or S)
- Lockable IDE hard drive list can be found here
- Molex splitter or external source
- Chimp Download
- Torx 10 & 20 Screwdrivers
Download Chimp and FTP the extracted version to your applications folder on the Xbox. Then copy the LINUXBOOT.CFG file to the root of the E:\ drive, and don't rename anything!
Procedure
1. Make sure your new Hard Drive jumper on the back is set to SLAVE.
(It will vary depending on drive)
2. Open your Xbox using the Torx screwdrivers. Remove the lid.
3. Make sure the mains are disconnected. Now, use the Molex splitter or external source to power both drives. So your Disk drive, Xbox HDD and New HDD has power
4. Connect your power and AV cord to your Xbox. Power on the Xbox and allow to boot into dashboard. Then disconnect the IDE cable from your DVD drive and Connect it to your new HDD
5. Launch Chimp from the Applications menu in your dashboard.
6. On the Main Menu of Chimp, select "Scan Physical IDE Devices". The system will tell you to make sure you have connected all of your IDE devices before continuing. Choose YES to continue. When it's finished make sure both drives are showing and then exit. for that screen.
7. When both HDD's are detected, choose "Clone Master to Slave". Again the system will ask you to make sure all IDE devices are connected. Choose Yes to continue. Do the clone "Full Disk".
8. This step will take a little while. The cloning process varies on time depending on how much data you have. For me it took little under 20 mins. When it is complete, choose exit to return to the menu.
9. Now, before leaving Chimp, we have to lock the drive. Choose "Lock Slave". It will now ask you where the source key is located. Choose an option from Motherboard.
10. Confirm the lock and you will be returned to the Main Menu. Now we're done. So now choose "Exit to Shell" and you will be returned to a command prompt looking thing.
11. Power off the Xbox.
12. Remove the original HDD, and Molex splitter. Set the new HDD to Master. Reconnect the IDE cable to the DVD drive and your new Hard Drive.
13. Before replacing the lid of the Xbox, power on the system and make sure it boots into the dashboard. Once is does, power down, and put it back together.
Congrats your Xbox Hard Drive is now upgraded!
=-----------------------------------------------------------------------------------------------------------------------------------------=